Monthly Archives: July 2015

Split Testing for Autoresponder Emails in Arigato PRO Intelligence Module

This feature requires at least Arigato PRO 2.5.1.5 and Intelligence module 1.0.8.

It allows you to split test different versions of emails and see which perform best. The best place to figure this out is the new “Advanced stats” page introduced recently.

To enable the feature select the following checkbox in the Add / Edit Email Message page:

split-testing

The feature is not available for newsletters.

Few things to note:

If you select “Enable split testing” the email will be included in split testing with other emails that have ALL of the following satisfied:

  • They are in the same autoresponder campaign
  • They have “Enable split testing” selected
  • They are of the same type (i.e. all emails are of type “Send X days after registration”, or all are of type “Send every X days” etc)
  • They have to be sent in the same day
  • The “time of the day” setting is the same

Emails based on individual user events (enabled by custom profile fields) can not be included in split testing.

The split test will deliver each email to approximately equal number of subscribers.

How exactly does it work:

When the autoresponder runs it will select all autoresponder emails that have to be sent today. If there are 8 receivers and 3 split testing emails for the day, they will be spread approximately equal between the 8 receivers so the first 3 receivers will receiver email A, the next 3 – email B, and the last 2 – email C.

Split testing does not guarantee equal number of receivers for each email in the split test over time.  For example if there are 3 emails in a split test but there is only one receiver today, he will receive email A. If the same happens tomorrow, the receiver will also receive email A, and not B or C. Split testing takes effect only on the given day so it’s recommended for larger mailing lists where at least several members are expected to receive given email in a given day.

Arigato PRO 2.5 and Intelligence Module 1.0.7

The WordPress drip marketing plugin Arigato PRO 2.5 has been released. It’s Intelligence module is also updated to version 1.0.7. In order to get the most of the new Performance Stats page, when updating Arigato PRO to 2.5 it’s recommended to also update the Intelligence module to the latest version.

Here is the changelog between versions 2.4 and 2.5:

  • You can restrict by user role the feature “Automatically subscribe in this list everyone who registers in my blog”.
  • The feature “When user subscribes to this mailing lists, register them as subscriber for my site too” also allows selecting user role.
  • New page “Advanced Stats” will show you excellent overview of your best performing newsletters, autoresponder campaigns, top subscribers, and more.
  • Unsubscribe stats will show you which newsletters, autoresponder campaigns and individual autoresponder emails lead to most unsubscribed users (note that these stats are recorded from a recent version so you won’t get meaningful results from before installing 2.5).
  • When users unsubscribe, we’ll record which email they clicked the “unsubscribe” link from. This info will be shown in the subscribers list page if you choose to not delete the unsubscribed users from the Arigato PRO Settings page.
  • The plugin will now track where the subscribers come from – web form (and on which page), added by admin, imported, subscribed by email, auto-subscribed, or subscribed by some custom method. This information will be visible in your list of users and can be filtered in the search form.
  • The number of active and unsubscribed users is now shown under each mailing list on the Mailing Lists page
  • Added num. sent & num. unsubscribed users under the list of emails in an autoresponder campaign. Same done for newsletters.
  • Custom fields will also be included in the search subscribers form. Note that the search is text-based and works the same way as searching in the default fields.
  • You can now easily setup your blog homepage or selected URL to work as “Squeeze page” and not show any of the WordPress header, footer, sidebar etc links.
  • Advanced role management lets you specify which pages and what access to them will be given to the different user roles. This lets you get your team members involved into the autoresponder management without giving them access to the whole functionality of the plugin. This configuration is available through a new link in the “Roles” section of the “Settings” page.
  • New setting lets you choose whether the unsubscribe page will display all lists or just the current list the user is unsubscribing from.
  • [Intelligence module] Post contents is also added as variable for the digests
  • [Intelligence module] New trigger: when user stays subscribed for X days do Y
  • [Inteligence module] Basic responsive template included

The update is sent by newsletter to eligible customers. If your free upgrades subscription has expired, you can renew for another full year for 40% of the regular price.

Namaste! LMS Bridge/Integration for WooCommerce

Our WatuPRO Bridge for WooCommerce is used a lot so we decided to build a similar one for Namaste! LMS.

From version 2.4.6 of Namaste! LMS a bridge is no longer required. The integration is built-in. Improvements coming soon!

Accept As a Primary Payment Method

In the Namaste! LMS Settings page, Payment Settings section,  enable the following option:

The option appears only when you have WooCommerce installed and activated.

(Note: even without it you can still use the old manual connection explained below on this page.)

Enabling this option will generate a WooCommerce product selector on all “Edit course” pages where the course has a non-zero price:

Note that only products which are both virtual and downloadable will be shown here. This is required to ensure that paying for the product will immediately make the order status completed and will automatically enroll the student in the course.

If you select a product here and save the connection, all enroll buttons for this course will automatically lead to the associated WooCommerce page. The other payment options will be ignored.

You can still sell other courses the regular way – if you don’t select a WooCommerce product, the enroll button will load your standard payment options, coupon fields, etc.

The old method described below can still be used. (Internally it is used when you enable the above link). There are two cases when this might be preferred:

  • If for some reason you don’t want the enroll buttons to automatically go to the WooCommerce page. Maybe you want to keep other payment methods along with WooCommerce on the same course, maybe you want to add some instructions, etc.
  • If you want to sell multiple courses as one WooCommerce product. In this case you have to use the manual method described below and list the multiple course IDs divided by |.

Manual (Old) Method of Linking Courses to Products

First, you need to create paid courses (non-zero price!) and/or classes (if you have Namaste! PRO). Then add them as products in your WooCommerce store. Name them any way you want, give any price you want.  The price you set in WooCommerce does not need to match the price you set in Namaste! LMS. The only important thing is to create a custom attribute with name “namaste-course” and value containing the ID of the course you want to sell, or “namaste-class” and the ID of the class you want to sell. Example:
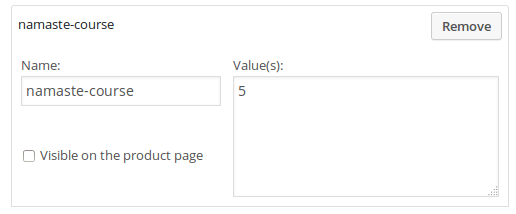
woocommerce-namasteNote! Do not create these attributes as custom attribute type from the separate Woocommerce Attributes menu. It needs to be done like on the image above -just enter “namaste-course” or “namaste-class” (without the quotes) in the small box and the ID in the big box. The drop-down at right should be saying “Custom product attribute”. Multiple IDs can be added separated by | sign.

Note that the WooCommerce product you create should be virtual and downloadable.

That’s all, you can start selling access to courses and classes. You can add coupons, bundles, and so on -anything that you would do with your WooCommerce products.

When the payment of order is completed, the access to the course or class will be activated. Access to course will not be given until the order status is COMPLETED. If the user is not logged in and does not exist, an user account will be created on the fly.

Redirect to the Course

The bridge supports automated redirecting after the order is paid. Just add another custom attribute to the same product. The attribute must have name namaste-redirect and value the URL of the course. You can also use any other URL if for some reason you want to redirect elsewhere.

If the user purchase multiple courses or classes in one shopping cart they will be redirected to the first purchased product which has the “namaste-redirect” attribute.