Monthly Archives: July 2021

Answers Paginator in WatuPRO

It’s sometimes a good idea to paginate the answers on the final screen of a long test. WatuPRO provides a variable for this:

%%ANSWERS-PAGINATED%% which can be used instead of the %%ANSWERS%% variable. It will display the questions along with their answers, feedback, correct/incorrect checkmarks, etc but one per page.

Although this paginator looks visually similar to the paginator you can enable while taking the quiz, it’s not the same. The in-quiz paginator colors the question numbers based on whether the question has been answered or not:

The green color should not be confused with correct / incorrect state. The questions are not evaluated on the fly so green means “answered”. Yellow is “visited but unanswered” and the questions that have not yet been shown are in gray.

To avoid confusion the answers paginator at the end of the quiz is not colored in any colors by default:

answers paginator

However in version 6.5.7 of WatuPRO we have added classes to all the buttons so you can easily color wrongly, unanswered and correctly answered questions with colors of your preference.

For example here’s how you can make it show gray, green and red colors:

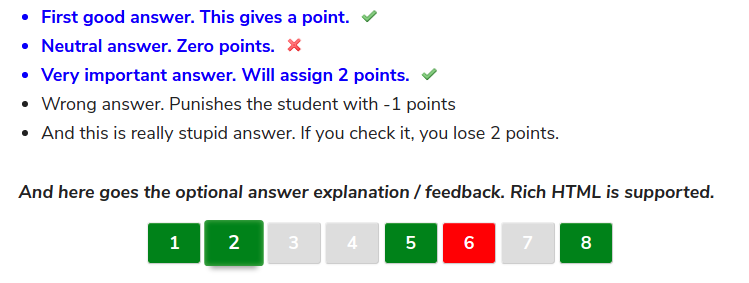
This is achieved by using the classes of each “li” element: “correct” if correctly answered and “empty” if unanswered.

Here is the CSS we have used to achieve this. You can copy it and paste in your Additional CSS box following this path: Appearance -> Customize -> Additional CSS:

/* correctly answered */
ul.watupro-answers-paginator li.correct {
	background: none green !important;
	color:white !important;
}

/* unanswered */
ul.watupro-answers-paginator li.empty {
	background: none #ddd !important;
	color:white !important;
}

/* wrong answers */
ul.watupro-answers-paginator li:not(.empty):not(.correct) {
	background: none red !important;
	color:white !important;
} 


Hierarchical Breadcrumb Navigation in Namaste! LMS

Since the introduction of the new [namaste-breadcrumb] shortcode in Namaste! LMS it’s now easy to add a breadcrumb navigation that lets you see your position in the learning process. It looks like this:

Course link >> Module link >> Lesson

Or if you don’t use modules:

Course link >> Lesson.

Simple. You can just drop the shortcode inside every lesson and/or module and you’ll get the navigation.

But how to add it to your theme?

There are two ways: the easiest is to get the Namaste! Premium theme which has this option built in:

Breadcrumb navigation in Namaste! LMS Theme

The other method is manual. It’s also not too hard, so let me explain how to do it. You’ll need a very basic understanding of HTML, editing PHP files and a text editor like Notepad++

  1. Download your theme locally.
  2. Open the file single.php. Use “Save as” and save it as single-namaste_lesson.php
  3. In that file find the following line:
    get_template_part( 'template-parts/content', get_post_format() );
  4. Replace it with this:
    get_template_part( 'template-parts/content-lessons', get_post_format() );
  5. Open the file template-parts/content.php. Use “Save as” and save it as template-parts/content-lessons.php
  6. Go right before the following line that wraps the article:
    <article id="post-<?php the_ID(); ?>" <?php post_class(); ?>>

    And add the following code:

    <?php echo do_shortcode('[namaste-breadcrumb]');?>

    Feel free to wrap it in a div or another element if you like.

That’s it. If you use modules, you need to repeat the steps but save the files as single-namaste_module.php and template-parts/content-modules.php. Also the line in step 4 will be like this:

get_template_part( 'template-parts/content-modules', get_post_format() );

Don’t forget that the shortcode allows you to use custom separator so you can use it like this:

<?php echo do_shortcode('[namaste-breadcrumb separator="/"]');?>


Zapier Webhooks in WatuPRO

The test and survey plugin WatuPRO just got a lot more connected by implementing Zapier Webhooks. (Well, technically, you can send data to any webhook URL – not just Zapier!). Available from version 6.5.7.5.

Here is how this works:

Hooks get notified when a user submits a selected test. You can use them to connect users to mailing lists services, CRM systems, all kind of marketing automation (like SaaS based alternatives of Arigato PRO), and anything else which may consume your contact data. Webhooks are used by all kind of low code / no code services.

You’ll see a new menu link under your WatuPRO menu: Webhooks / Zapier.
Click on it and get to the simple interface for adding a new webhook or editing your existing webhooks.

At the very minimum you need to select which quiz triggers a webhook and enter the endpoint URL. You can choose to notify the hook only if a selected grade / result is achieved on the test. Or fire it for any result.

What Data You Can Send

Let’s have a look at the structure of data WatuPRO can send to your webhook:

Hooks will be sent only if we have at least some data about the user: the very minimum is an email address. If your users are logged in, you’ll always have an email address. The other options is the set the quiz send email to the user when submitting it. In this case they will be asked to provide an email address.

And the third and the most flexible option is to use the “Ask for user contact data” section. You can find it on the Edit quiz -> User and Email tab:

It lets you collect several fields of contact information before the start of the survey of at the end, right before showing the results.

All this data can be sent to any webhooks.

Let’s deconstruct it field by field:

  • Name. You can collect user’s name either this way or from their user profile if they are logged in.
  • Email. As explained above, there are 3 options.
  • Contact phone. Will be available if you have collected it using the above section. You can rename the field and use it for any other data – for example to collect gender or age. We just refer to it as the phone field.
  • Contact company. Same as above.
  • Contact custom field 1 and custom field 2. You can use these to collect any other contact data. Zip, address, interests, a product used, and so on.

All these fields provide dynamic data collected by the user. You don’t need to and can’t set a fixed value that will be sent to the hook.

The name of each variable is defined by you. Since the webhook gets notified with the data in a JSON object, we let you choose what name to have each variable. If the receiving hook has a specific requirement you can use these names to make the JSON data satisfy it.

Then there are 3 custom parameters where you can provide both name and data. They can be useful for sending API keys to the hook or any other static data that does not depend on the specific user and quiz attempt.

Here is an example JSON data sent to a test webhook at Pipedream:

The variable names come from our webhook settings in WatuPRO. The data comes from the quiz taker. We have requested a company at the beginning of the quiz but decided to not include it in the hook request by simply not entering a variable name. So the data came as shown above.

We strongly recommend checking the Zapier Webhooks guide linked at the beginning of this article to understand better the nature of webhooks. They are super simple and super powerful