Monthly Archives: March 2017

WatuPRO Integration With MoolaMojo

From version 5.4.4.5 the quiz plugin WatuPRO has built-in integration with MoolaMojo. The integration has two main aspects:

  1. You can reward virtual credits for completing tests.
  2. You can charge virtual credits for access to paid tests (this option requires WatuPRO Intelligence module).

Let’s elaborate on both:

Reward MoolaMojo Credits for Completing WatuPRO Tests

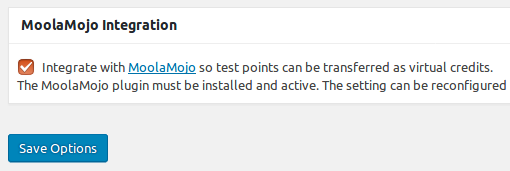
To enable this option select the following checkbox on the WatuPRO Settings page:

The setting alone will only allow you to configure per-quiz behavior. To do it, go to the Add/Edit Quiz page, Other Advanced Settings tab and enable the setting:

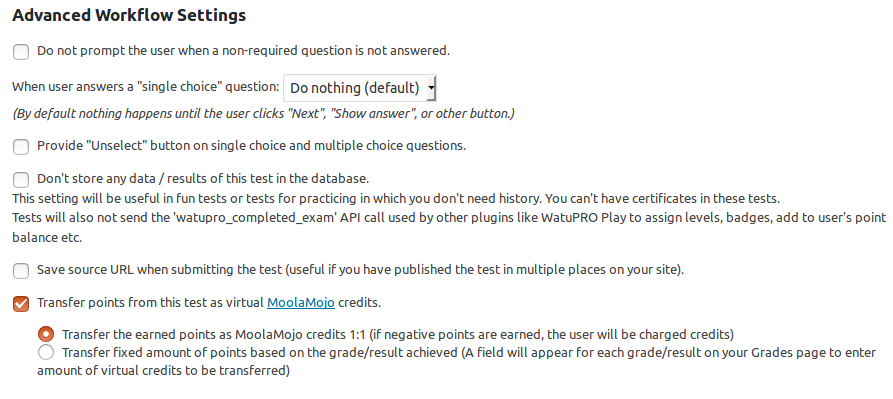
When you check the checkbox the two options will appear. The first will directly transfer the amount of points the quiz taker has collected into their virtual credits balance.

If you select the second option and save the quiz, you will get a box on the Grades page (one for each grade/result)  to enter fixed amount of credits to be given depending on the grade. Note that you can enter negative numbers, i.e. you can charge the user for achieving a bad grade.

MoolaMojo WordPress Virtual Credits System

We have just released a new free virtual currency & credits system for WordPress – MoolaMojo. The plugin is similar to myCRED but easier to use and integrate.

It can be used to:

  • Reward users virtual points for doing things on your site
  • Sell products, subscriptions or services for virtual credits
  • Sell virtual credits for real money

In its core it’s a simple thing but is extremely powerful and will allow you to extract a lot more value of your user’s interactions.

Integrations with Namaste! LMS, Watu/Pro, and Konnichiwa are coming shortly. And not only this: the integration API of the plugin is so simple, we expect other authors will make it soon as well.

Importing Subscribers in Arigato PRO

Importing subscribers in Arigato PRO is easy but entering field numbers can be a bit confusing. Especially if you have custom fields in the mailing list and the CSV file. This guide will clear it all up.

Note! If your file contains any non-English characters (for example Asian, Cyrillic, any French and Spanish accents etc.), you must encode it in Unicode / UTF-8 format! See how to do it.

Let’s make an example with a mailing list with 3 custom fields:

And a CSV file which doesn’t perfectly match the mailing list:

And when you click on “Import subscribers” in Arigato PRO, this is what you see:

So there are a few problems to deal with here:

  • The CSV file does not contain “Name” column. It contains first name and last name columns and you want the name in your mailing list to contain first and last name.
  • The CSV file has the columns ordered in a way that obviously isn’t the same as the order on the import page.
  • The CSV file contains some columns you don’t need (Client ID, State, ZIp, Phone, Address) and lacks the Age data.

So how to import this? Let’s visually number the columns in the CSV file:

Now things become simpler and we just have to watch at the import page first, find the field we need in the CSV and enter its number. Because “name” is constructed by 2 column, we enter them both with “+”. Here you go:

Let’s explain:

  • Email is column number 7 in the file so we enter it before the comma in the “Email,  Name” field.
  • Name is constructed by columns 2 and 3 so we enter them as “2+3” after the comma. So the “Email, Name” field becomes “7, 2+3. Spaces do not matter.
  • The CSV file does not contain fields for IP address, signup date and age. So we leave these blank.
  • Company is column number 9.
  • Gender is column number 10.

That’s it, import with “Skip first line (column titles) when importing” selected. And we are done: