Our WatuPRO Bridge for WooCommerce is used a lot so we decided to build a similar one for Namaste! LMS.
From version 2.4.6 of Namaste! LMS a bridge is no longer required. The integration is built-in. Improvements coming soon!
Accept As a Primary Payment Method
In the Namaste! LMS Settings page, Payment Settings section, enable the following option:

The option appears only when you have WooCommerce installed and activated.
(Note: even without it you can still use the old manual connection explained below on this page.)
Enabling this option will generate a WooCommerce product selector on all “Edit course” pages where the course has a non-zero price:

Note that only products which are both virtual and downloadable will be shown here. This is required to ensure that paying for the product will immediately make the order status completed and will automatically enroll the student in the course.
If you select a product here and save the connection, all enroll buttons for this course will automatically lead to the associated WooCommerce page. The other payment options will be ignored.
You can still sell other courses the regular way – if you don’t select a WooCommerce product, the enroll button will load your standard payment options, coupon fields, etc.
The old method described below can still be used. (Internally it is used when you enable the above link). There are two cases when this might be preferred:
- If for some reason you don’t want the enroll buttons to automatically go to the WooCommerce page. Maybe you want to keep other payment methods along with WooCommerce on the same course, maybe you want to add some instructions, etc.
- If you want to sell multiple courses as one WooCommerce product. In this case you have to use the manual method described below and list the multiple course IDs divided by |.
Manual (Old) Method of Linking Courses to Products
First, you need to create paid courses (non-zero price!) and/or classes (if you have Namaste! PRO). Then add them as products in your WooCommerce store. Name them any way you want, give any price you want. The price you set in WooCommerce does not need to match the price you set in Namaste! LMS. The only important thing is to create a custom attribute with name “namaste-course” and value containing the ID of the course you want to sell, or “namaste-class” and the ID of the class you want to sell. Example:
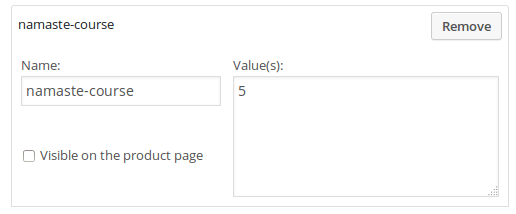 Note! Do not create these attributes as custom attribute type from the separate Woocommerce Attributes menu. It needs to be done like on the image above -just enter “namaste-course” or “namaste-class” (without the quotes) in the small box and the ID in the big box. The drop-down at right should be saying “Custom product attribute”. Multiple IDs can be added separated by | sign.
Note that the WooCommerce product you create should be virtual and downloadable.
That’s all, you can start selling access to courses and classes. You can add coupons, bundles, and so on -anything that you would do with your WooCommerce products.
When the payment of order is completed, the access to the course or class will be activated. Access to course will not be given until the order status is COMPLETED. If the user is not logged in and does not exist, an user account will be created on the fly.
Redirect to the Course
The bridge supports automated redirecting after the order is paid. Just add another custom attribute to the same product. The attribute must have name namaste-redirect and value the URL of the course. You can also use any other URL if for some reason you want to redirect elsewhere.
If the user purchase multiple courses or classes in one shopping cart they will be redirected to the first purchased product which has the “namaste-redirect” attribute.