Monthly Archives: February 2015

Rooms with Overbooking in Hostel PRO

From version 1.6 the hostel management WordPress plugin Hostel PRO has a new option that allows overbooking the number of beds in a room.

What’s the purpose?

Some hostels have multiple rooms of the same type, same price etc. Their owners don’t want to confuse users with for example 10 rooms of the same type in the drop-down on the booking form. Why should you list 10 “2-bed private ensuite” with the same price when you can list it only once?

“Allow overbooking” feature solves this problem.

How to use It?

In the add / edit room page you’ll see a new field saying “Allow overbooking up to [   ] beds”:

overbook

Enter the total number of beds you have in rooms of the same type. For example if you have 5 rooms with two beds, enter 10 here.

Keep the number of beds in the room the real one – if it’s a 2 beds room, enter 2 in the “number of beds” field, not 10. The total number should only go in the “Allow overbooking up to…” field.

Create only one room – there is no need to create all the 5 rooms in the system.

When user searches for room they will be able to book even if there are other bookings for the room for the same date – until all the rooms are booked. In the above example, if there are already 5 bookings for given date range, the 6th time someone tries to book, they’ll see the room is unavailable.

This setting works both for private and dorm rooms. Have in mind that when using it for dorms there is a risk that some group of people may need to be separated in 2 or more of the available rooms because the system will allow booking until all the beds are taken.


InstaMojo Integration for WatuPRO

This is no longer functional.

Instamojo completely revamped their interface and removed the old way of working with their system without any notice so we are not willing to continue development for their platform.

Instead of this integration, Instamojo users can sell quizzes through WooCommerce, using our free WooCommerce bridge and Instamojo’s official WooCommerce integration.

********************

OLD INSTRUCTIONS FOR REFERRENCE ONLY:

This plugin will let users from India who have the Intelligence module for WatuPRO to sell access to quizzes via the Instamojo payment service. (Of course you can also use the Woocommerce bridge.)

The plugin requires WatuPRO version min. 4.7.3.3 and 4.7.3.4 if you want to also use the coupon  codes feature.

Download watupro-instamojo here (18 KB)

How To Use It

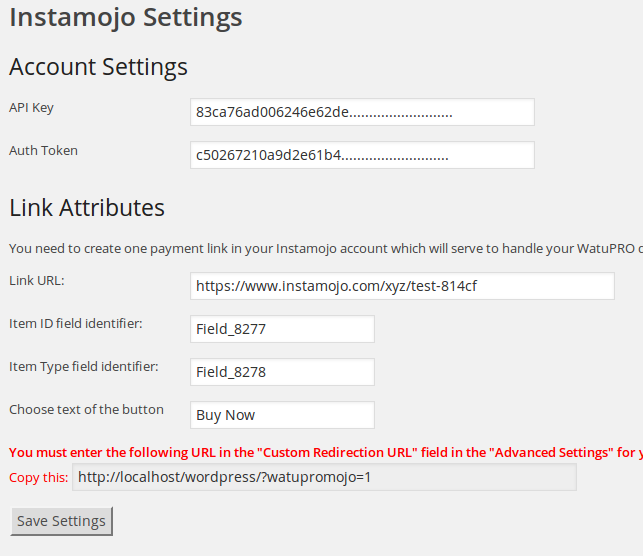
Install the plugin and activate it. A new menu item will appear under your WatuPRO menu. The item is called “Instamojo integration”:

instamojo

Before you can proceed you need the following:

  • Your API key and Auth token. Once you have an Instamojo account you can obtain these from the Developers section.
  • A dynamic payment link. The link must have a fixed price and “Pay what you want” options selected.
  • The link must also have two custom fields added in the Advanced Settings section in your Instamojo link management page. One of the fields should be called item_id and the other field should be item_type.
  • It needs to have “Custom redirection URL” attribute also set up. You can see the URL in your “Instamojo Integration” page in WatuPRO.

Once all this is done, ensure a couple more things:

1. You must enter the field identifiers of the custom fields in the Instamojo Integration page. The field indentifiers are visible in the “Custom fields” section of the Instamojo link management page for the given link. You need to mouse over the field names to see the identifiers.

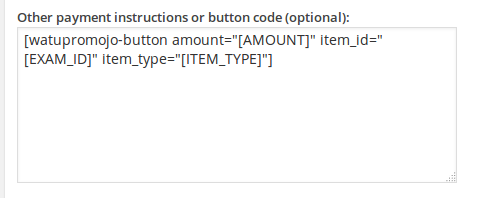
2. You have to enter the following code inside your “Other payment instructions” box in WatuPRO Settings page (exactly as you see, just copy and paste)

[watupromojo-button amount="[AMOUNT]" item_id="[EXAM_ID]" item_type="[ITEM_TYPE]"]

other-methods

This will generate a payment link on your paid quizzes. It can work along with all other payment methods. The payment link has class “watupromojo-button” so feel free to style it.

Localization and Styling Of The Datepicker in Hostel and HostelPRO

From version 1.5.9 the HostelPRO WordPress plugin and version 0.8.9 of the free Hostel plugin  there are a couple of settings that will let you easily localize and style the datepicker (calendar).

Here is how. Go to the HostelPRO Settings page and scroll near the bottom where you’ll see the following:

datepickerThe first box is blank by default. If you leave it blank, your calendar will be in English. If you want to have the datepicker in your language you need to enter localization file URL in the box.

All the jQuery UI Datepicker localization files are available at this URL. Pick the one that you need and click on it. Then click on the “Raw” button:

raw-githubThis goes to a javascript file that will be shown directly in your browser. Although you can copy the URL from the address bar of your browser and use it directly (like on our screenshot), we don’t recommend this. It’s better to save the file in your computer and then upload it to your blog. You can use the “Media” menu in your WordPress dashboard and upload the file, then get its URL. Save it in the box and that’s all – your datepicker is now going to be in your desired language.

For best performance it’s recommended that your whole blog is also localized.

The CSS theme URL defines how your datepicker is styled. We load the “smoothness” theme by default but you can change this by entering different CSS URL. Many ready themes are available on the CDN here. Just select one and feel free to copy the URL and save it. (Or download the file if you prefer, like with the localization file).

That’s it, the theme will be changed after saving. Of course you can also use the Theme Roller to create your own CSS.

Note that If you run both Hostel and HostelPRO for some reason, these settings are shared. Whatever you set in one of the plugins, affects the other one just like it is with rooms, rates etc. This ensures that when users upgrade from Hostel to HostelPRO there is no need of any manual data transfer.