Author Archives: admin

WatuPRO Bridge to ActiveCampaign

This free bridge is for customers who manage their mailing lists and newsletters with ActiveCampaign. Similarly to our MailChimp bridge, this plugin will let you automatically subscribe users who take quizzes to your mailing lists in ActiveCampaign.

Download version 0.4 (9 KB)

To use the bridge you’ll need your ActiveCampaign API key and API URL which you can find in your Account Settings -> Developers section.

Adding rules is super simple. Once the plugin is installed you’ll see a link “Bridge to ActiveCampaign” in your WatuPRO menu. Go to it and you can add any number of rules:

Running A/B Tests in Arigato Gozaimasu

A/B testing is a great way to figure out which of different subscribe form designs perform best by attracting most subscribers per impression. And since the visual designer in Arigato Gozaimasu provides you a lot of possible designs – regular inline forms, responsive pop-ups, sticky top or bottom bars, or animated slide-ins – it’s great to know what works best for you. Now you can do it, with the A/B testing tool that the module provides.

Creating A/B Tests

To create A/B tests for a mailing list you need to create at least 2 form designs for that list using the Gozaimasu visual designer. You can access the visual designer through your Mailing Lists page under column Subscribe Form. The link is just under the simple subscribe form shortcode:

Once you have created and saved at least two designs you will see the A/B tests link next to the Save Design button:

It will also be shown on the Mailing Lists page next to the Visual designer link:

Clicking on the link will take you to the page with A/B tests created for that mailing list. A/B tests are always specific to a mailing list. Initially you will see no tests (because you have to create them first). Creating a test is very simple, it just requires name and selecting which of the existing designs you want to test. Include at least two designs:

That’s it. Save your test and when you go to the previous page you will see it along with its shortcode:

The shortcode of the test is what you need to publish on a page or inside a widget on your site to get the test running. Important: stats will not be recorded for the A/B if you use the individual design shortcodes provided on the Visual designer page. You should use the A/B test shortcode.

It ensures equal rotation of all the designs included in it and calculates stats that will show you which design performs best.

Viewing and Interpretation of Results

Once your A/B test start getting impressions you will see a table showing the performance of the different designs tested:

Since the tool ensures equal number of impressions for each tested design, the most important metrics you need to look at are the percentages – signups / impressions and active / impressions. Here “active” means the subscribers who have confirmed their email addresses so it’s probably correct to assume it the most important stat you need to know. The design that has the highest percentage of active / confirmed subscribers per 100 impressions is the best performing design.

We would recommend waiting for at least few hundred impressions per design before making conclusions. Once you decide on the best design you can replace the A/B test shortcode on your pages with the specific design shortcode.

Using Dynamic Variables in WatuPRO Email Field

WatuPRO comes with an option to send email with respondent’s answers when a test is submitted. This is found in Edit Quiz page -> User and Email Related Settings tab and is pretty straightforward. You can select to send the email to the user and yourself  -the site administrator, to the email address defined in your WatuPRO Settings page:

In the WatuPRO Edit Quiz page -> User and Email Related Settings you can override this setting and set another email address to the admin’s email for that specific quiz. But this is not all. You can also use several variables to dynamically define the receiver of each quiz attempt depending on the specific quiz taker. You can use variables together with fixed email address or alone. Here’s and example and then we’ll deconstruct all the possible variables:

As you can see, you can mix and place several possible emails together, separated by comma.

Variables from “Ask for user contact details” section

If you scroll down on the same tab of the Edit Quiz page you will see the Ask for user contact details section which allows you to request several contact fields at the beginning or the end of the test. As you can see each of these fields can be asked for or not asked for, or made required/mandatory, and each of them has an associated variable:

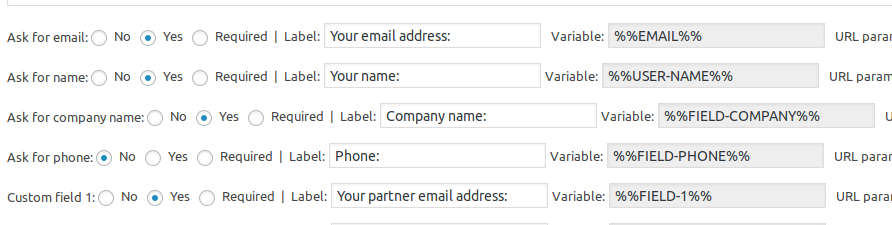
So each of these fields can be used as dynamic source of email address. For example in the above image we have asked for partner’s email address in custom field 1. So if we want to send the user’s quiz results to their partner we’ll add the variable %%FIELD-1%% in the list of email addresses to send to.

Group Managers

You can also use the variable %%GROUP-MANAGERS%% to send emails to all users with “manage quizzes” rights that are from the same user groups as the respondent (provided the respondent is a registered user). User groups are defined in WatuPRO User Groups page and you can edit each user’s group in their profile, set groups to be automatically assigned on registration, and so on.

So by using %%GROUP-MANAGERS%% in the field the results of the test taker will be sent to all those users.


Dynamic data from user meta fields

Here’s the most powerful part which works for respondents that are registered users. You can construct your own variables based on keys from the wp_usermeta table like this:

{{{usermeta-meta_key}}} where key_name is the name of the key in wp_usermeta. If the meta data with the key of that user contains an email address, the results will be sent to it. If the key contains a number, the program will assume user ID and will send the results to that user’s email.

So let’s deconstruct the variable from our example:

The variable {{{usermeta-company_manager}}} says that we’ll get the data from wp_usermeta where the key is “company_manager” and the user_id field contains the ID of the currently logged user.

This meta data could be either manually entered by you or generated by other plugin or custom code. It is your responsibility to be careful with the meta data and not use anything unsafe that could expose personal data to someone who isn’t supposed to see it.