Category Archives: Tips

Conditionally Load Scripts and CSS in WordPress Plugins That Use Shortcodes

The official way of loading javascript and CSS files in WordPress is by loading your scripts on wp_enqueue_scripts hook. The problem with this approach is that every single plugin you use will be adding its own scripts and CSS even if its used just once in a single post or page. This approach can quickly overload your blog with CSS files and scripts which you don’t use on most pages.

This is especially true for plugins that use shortcodes.

There is an easy way to solve this!

Due to the holes in the official WordPress documentation most developers are not using it.
Others has to develop smart but no longer necessary hacks like this here. The problem with the proposed solution on that page are at least three:

  • Unnecessary complexity in the code
  • Consuming extra server cycles
  • It will sometimes load your scripts when you don’t need them. For example in my theme the solution was still loading the scripts everywhere because of the loop of “Recent posts” in the sidebar.

So, this is far from perfect. Here is the simplest solution:

Call wp_enqueue_script inside the shortcode functions

It’s really that simple and we are starting to use this approach in our WatuPRO. WordPress handles  this from version 3.3 so you need to use the old “load everywhere” solution for older versions.

Here is a code example of this technique from WatuPRO:

[sourcecode language=’php’]
// this is in our init function. If version is 3.3 or lower we just use the official way
$version = get_bloginfo(“version”);
if($version <= 3.3) add_action("wp_enqueue_scripts", "watupro_vc_scripts"); // then in our shortcode handlers we simply call watupro_vc_scripts directly: function watupro_shortcode($attr) { watupro_vc_scripts(); // ..... } [/sourcecode] Inside watupro_vs_scripts() there are all the wp_register_script and wp_enqueue_script calls. This seems to work fine on all versions. If you have any comments, please let me know.

Dynamically Add Input Form Fields With jQuery

And how to deal with the data on the server-side (PHP)

A very frequent requirement from customers is to have input fields dynamically added to a form while typing in it. This should happen without refreshing the page because the user shouldn't be submitting the form before all their information is completed. Here below is a simple example of such interface:
Item quantity: Item name:

Click on the "Add Row" button and you'll see it in action. Ever wondered how to do something like this? Let me show you.

Download Working Example Here! (some fixes to the code are added inside)

The HTML

The HTML code for this is actually quite simple. It's just a form with onclick action at the "Add row" button: [sourcecode language='html']
Item quantity: Item name:
[/sourcecode]

The JavaScript (jQuery)

If you had to do this with basic Javascript, it would require lots of typing. But the jQuery's html() method takes all the browser-related hassle out of you, so you can just construct your HTML code and append it when the button is clicked: [sourcecode language='javascript'] var rowNum = 0; function addRow(frm) { rowNum ++; var row = '

Item quantity: Item name:

'; jQuery('#itemRows').append(row); frm.add_qty.value = ''; frm.add_name.value = ''; } [/sourcecode] This function simply constructs HTML code for a new row while filling the form field values from the data supplied by the form. Then it appends the code to the wrapper DIV element and cleanups the values in the original form. Cleaning up the values is good user experience practice in such cases. Otherwise the user will be confused whether the first row will be stored to the database or not. The added rows don't have another "add row" button. Instead of this they have "remove" button in case the user has added too many rows and wants to delete some of them. Here is the removeRow() function: [sourcecode language='javascript'] function removeRow(rnum) { jQuery('#rowNum'+rnum).remove(); } [/sourcecode] Now you can see why we needed to count the rows and to use that rowNum global variable. We needed unique ID on each row so it can be removed.

The Back-End (PHP) - Inserting the records

At the server-side there is a straighforward and a tricky part. I'll show you the easy one first - inserting the data. Let's assume we have a MySQL database and a very simple table called products with fields id, qty and name. So when processing the POST data we'll do something like this: [sourcecode language='php'] foreach($_POST['qty'] as $cnt => $qty) { $sql = "INSERT INTO products (qty, name) VALUES ('$qty', '".$_POST['name'][$cnt]."');"; // run the query - with mysqli_query or whatever database wrapper you are using // ... } [/sourcecode] (Please note there is no security filtering done in the query above) In case you don't understand, here's the explanation: as the field names had [], in PHP this will send $_POST array with the name of the field and the values from all form fields with this name. So we are iterating through the $_POST array 'qty' while taking the current index in $cnt. Then we use the same $cnt to match the same row value in $_POST['name']. And that's it, the data is inserted.

The Back-End (PHP) - Updating the records

This is where the things become tricky. We have several goals:
  • To let the user see and edit already inserted data
  • To let the user add new data
  • To let the user remove data
This means we have to construct some more HTML and basically break it in two parts - editing existing data and adding new data. The HTML/jQuery code for adding new data will be exactly the same as above. So let's see what can we do with the existing data: [sourcecode language='php'] // let's assume you have the product data from the DB in variable called $products foreach($products as $product):?>

Item quantity: Item name: Mark to delete

[/sourcecode] What's going on here? We are iterating through the existing DB records and displaying similar forms for them letting the user edit the data. We also add a checkbox that allows them to mark a product for deletion. All the changes will be stored after the form is submitted. Like this: [sourcecode language='php'] // first delete the records marked for deletion. Why? Because we don't want to process them in the code below if(is_array($_POST['delete_ids']) and !empty($_POST['delete_ids'])) { // you can optimize below into a single query, but let's keep it simple and clear for now: foreach($_POST['delete_ids'] as $id) { $sql = "DELETE FROM products WHERE id=$id"; // run the query - not shown } } // now, to edit the existing data, we have to select all the records in a variable. $sql="SELECT * FROM products ORDER BY id"; $products = .... // run your DB wrapper methods here to fill $products // now edit them foreach($products as $product) { // remember how we constructed the field names above? This was with the idea to access the values easy now $sql = "UPDATE products SET qty='".$_POST['qty'.$product['id']]."', name='".$_POST['name'.$product['id']]."' WHERE id='$product[id]'"; // run the query } // (feel free to optimize this so query is executed only when a product is actually changed) [/sourcecode] And after the above is done, don't forget to also add the new products with the same code as in "Inserting the records" section. That's it. Was it clear and easy?

A Few Interesting Scripts

Browsing Codecanyon I've found several ready scripts that do something like what I have described above. Have a look at them and decide yourself if some of them can do the work for you:

How To Translate a WordPress Plugin

This is valid not only for translations but also for changing any texts within a plugin. We got this asked a lot. The official WordPress guide about translating is a bit confusing and isn't focused on plugins, so I decided to write a short guide here. It will use WatuPRO as an example but is also applicable to any other properly written and localization-ready WordPress plugin. Let's go, step by step. (Note: WatuPRO customers can find some existing community translations here)

Using Loco Translate (Recommended)

If you can't get the translation to work, check the Troubleshooting section.

1. Install and activate Loco Translate

Loco Translate is the de-facto standard for doing this, it's free and easy to use.

2. Create New Translation

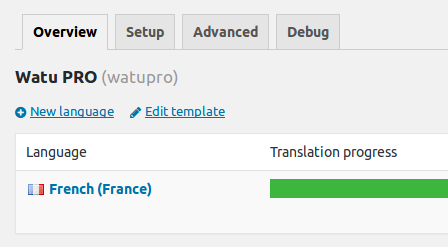
Unless you have downloaded a translation file, you will need to create new translation. Select the plugin from the "Plugins" menu under Loco Translate and click on "New Language": On the next screen select your language and choose a location: 
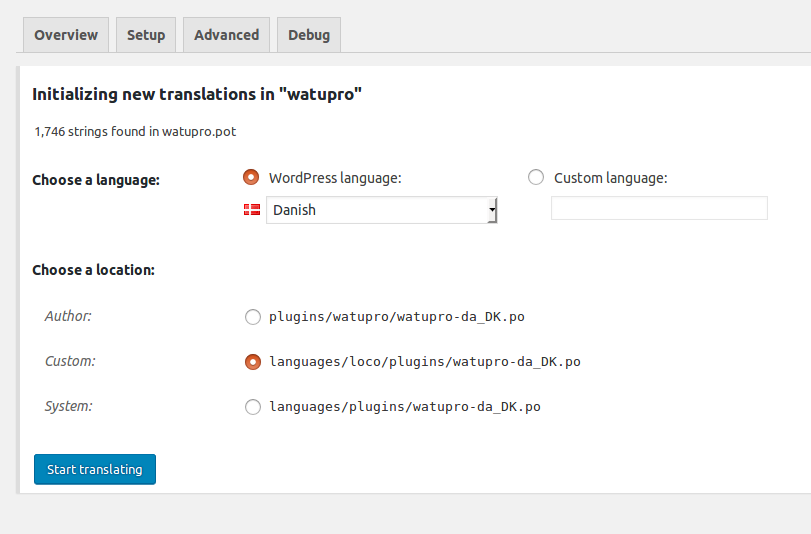
When doing a new translation yourself or editing a translation select the second option - "Custom" as shown above. This will ensure that your files will not be deleted if you manually update the plugin by deleting it and uploading a new version. That's it, you are ready to go. Click on "Start Translating" and translate the texts you need translated. You don't need to translate all text in the plugin.

3. Translating from an exiting incomplete .po/.mo files

Say you have obtained an existing translation but you want to do some changes. For example you have downloaded a community translation of WatuPRO. Because these are products of voluntarily efforts they often aren't up to date with the ever evolving plugin. Some strings will be changed, some new strings will be added, etc. When you load the files in your wp-content/languages/plugins folder, Loco Translate will recognize the translation and show it. However it will not be showing the new strings that we added in English but are not existing in the community translation. To solve this, simply click on the Sync button: 
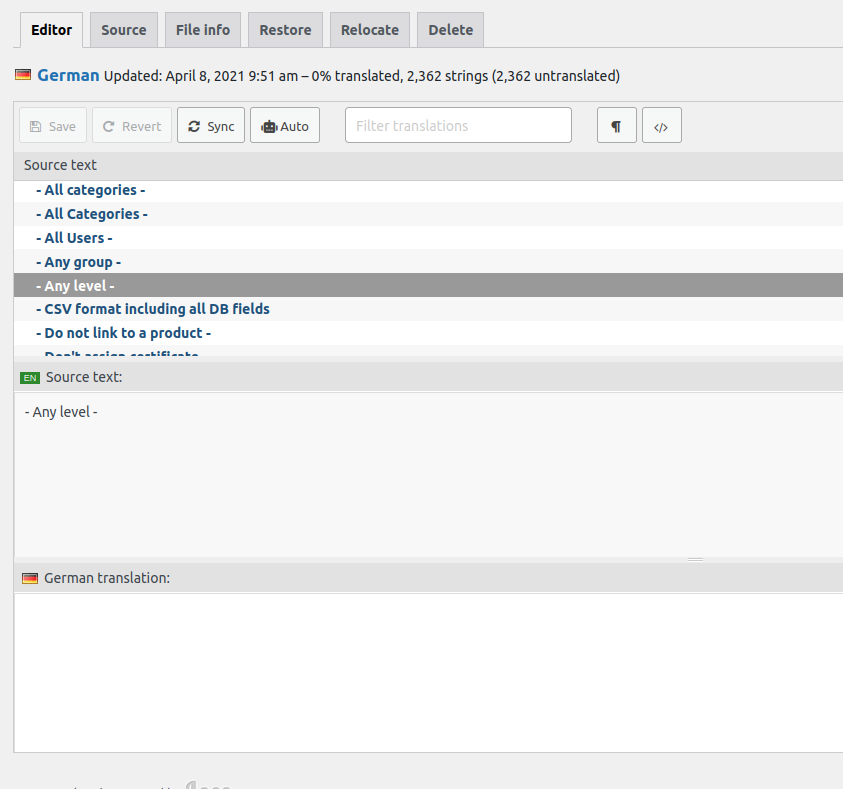
Voila, now you have them and can continue translating.

Manual Way

If for some reason you don't want to use Loco Translate, here's how to do the translation manually.

1. Get Poedit

Poedit is free editor for .pot files and de-facto the standard for working with them. Unless you have specific alternative in mind and a good reason to use it, I recommend you downloading Poedit, it's available for most operating systems.

2. Open the .pot file

poedit You actually need to go to File -> New Catalog from POT file. Select the .pot (in WatuPRO this is watupro.pot stored in the root) and double-click on it. Poedit will ask you about project title - you can use the default one. Then you'll need to save the catalog as .po and .mo files. I recommend you properly name the target file right from this moment. The official docs are a bit lacking on this issue, and it's very important. The name of your .po and .mo file should be constructed like this: plugin-textdomain-with-dashes-locale_Locale.po. To make it more clear, let's use WatuPRO example again and a French translation. The proper name is: watupro-fr_FR.po and watupro-fr_FR.mo How will you know what are the correct parts of this name? The plugin textdomain is usually same as the folder name of the plugin, but to be safe you should seek information from its author OR open the main plugin file and search for "load_plugin_textdomain" call. The first word in the braces is the plugin textdomain. The proper name of your locale can be found at http://codex.wordpress.org/WordPress_in_Your_Language Where to save these files? The best place is wp-content/languages/plugins folder. This way you will not lose your translation even if manually applying a new version of your plugin.

3. Translate It

Some guides will tell you that you have to translate everything. NO. This is not true. You can omit strings and translate only what you need translated. For example users of plugins like WatuPRO may want only the end-user facing texts translated. In such a case you don't have to spend time translating everything - the plugin will work just fine with only a few localized texts. For the rest it will use the non-translated text (usually English). Important: Don't translate any %s or %d characters that you see in the texts. They will be replaced with dynamic texts and numbers. Just leave them as is.

4. Set Your Locale in wp-config.php

Note: From WordPress version 4.0 this constant is no longer used and is IGNORED. You need to set your lancuage in your Dashboard -> Settings page. This is a very important step and without it nothing will work. This below is valid only for WordPress versions before version 4.0. Unless you already use a translated version of WordPress, it's possible that your locale is not set in wp-config.php. So open the file and find "WPLANG". You will see a line like this: define('WPLANG', ''); You have to add your locale there. Using the French example, it will be: define('WPLANG', 'fr_FR'); That's it. Save the file and re-upload it. Don't worry, any plugins and themes that are not translated will keep working fine in English.

5. Re-activate the plugin

Some users report that even after going through the above steps, nothing happens. So you may need to re-activate the plugin to get it to work (this is not documented anywhere so I am not even sure why it's sometimes required and sometimes - not).

Troubleshooting

If your translation does not work, please double and triple check the following:
  • Your .po / .mo files have the correct names. Using the WatuPRO example and French / France this means watupro-fr_FR.po and watupro-fr_FR.mo. These names will be different for other plugins and other locales.
  • Your .po / .mo files are in the correct place: wp-content/languages/plugins. Place them there and NOT under the plugin folder. If directory "plugins" does not exist, create it.
  • You have selected your language / locale in the WordPress Settings page.
Ideally you shouldn't have to contact us about problems with translation. If you still do, you'll need to provide us admin access to have a look. But all we can do is to ensure all the above steps are properly completed.