Category Archives: Uncategorized

Namaste! PRO 1.4

The Pro add-on for Namaste! LMS is now updated to version 1.4. Here are the new features, improvements and bug fixes:

    • School accounts. More info at: http://demo.namaste-lms.org/school-accounts/
    • Added limit for number of students that can sign up under a school account.
    • Class/Group signups can have expiration period. After student’s subscription expires they lose access and need to sign up again.
    • You can now mass assign students to a group (class).
    • Access to the Pro management pages can now be fine-tuned at WP Role level.
    • The student classes/groups will be shown on the Namaste! Manage Students page.
    • Class / group permissions will now be applied to the Manage Students page.
    • Added course re-certification option. Student can be automatically cleaned up (and optionally re-enrolled) X days after course enrollment or completion.
    • When 100% discount code is used the student will directly be signed to the class.
    • Added shortcode to display user badges.
    • Added shortcode parameter “enroll_in” to the namaste-class-signup shortcode. By passing single course ID in this parameter you can automatically enroll the student in the associated course along with signing for the class/group.
    • Added option to leave class. The button is automatically generated when the class-signup shortcode is used on classes that you are already signed in.
    • The course progress table now has links to the lessons.
    • Fixed bug: applying coupon on courses worked randomly on Paypal PDT. Now made sure to handle all cases.

Eligible customers will receive the upgrade for free. If your one year subscription period has expired you can renew for 40% of the full price.



How To Design The Sign Up Forms in Arigato PRO

When you use the shortcode for a sign-up form in Arigato PRO it generates a very clean basic responsive HTML code without any pre-formatting. The idea is that the form will nicely fit your WordPress theme design and stay consistent with it.

If your theme does not have any styling of standard form elements or have odd styling you may need to modify the CSS yourself. Here is the HTML code of a basic form:

<form method="post" enctype="multipart/form-data" class="bftpro-front-form" onsubmit="return validateBFTProUser(this,false);" >
	<div><label>Your Name:</label> <input type="text" name="bftpro_name"></div>
	<div><label>*Your Email:</label> <input type="text" name="email"></div>	
	<div class="bftpro-front-signup-button">
	   <input type="submit" value="Subscribe">				
	</div>
	<input type="hidden" name="bftpro_subscribe" value="1">
        <input type="hidden" name="list_id" value="1">		
	<input type="hidden" name="required_fields[]" value="">	
</form>

Such a form looks good on our theme:

But with a bit of CSS you can make it look different if you wish. The form has class so you can style the elements. Example CSS:

.bftpro-front-form div label {
display:block;
float:left;
width: 150px;
font-weight:bold;
font-size: 120%;
font-family: Verdana;
color: darkblue;
}

.bftpro-front-form input[type=text] {
height: 25px;
font-weight: bold;
font-size: 120%;
}

.bftpro-front-form input[type=submit] {
padding:5px 15px;
background:#ccc;
border:0 none;
cursor:pointer;
-webkit-border-radius: 5px;
border-radius: 5px;
}

With this CSS the same form code starts looking like this:


Your custom CSS code can be written either directly to the theme CSS or be added on the site using a plugn like Simple Custom CSS

WooCommerce Integration in MoolaMojo

From version 0.6.8 the WordPress virtual currency plugin MoolaMojo supports selling currency packages through WooCommerce. This opens endless possibilities to sell all kind of stuff from all kind of plugins through WooCommerce. For example it becomes easy to sell virtual currency packages that can be then used to purchase access to WatuPRO paid quizzes (especially useful if WatuPRO does not support your payment processor but WooCommerce does).

Here’s what is required to make this work:

  1. WooCommerce and MoolaMojo installed and active
  2. Create some currency packages in MoolaMojo
  3. Create product(s) in WooCommerce for selling the MoolaMojo packages. You need to two things to make this work:
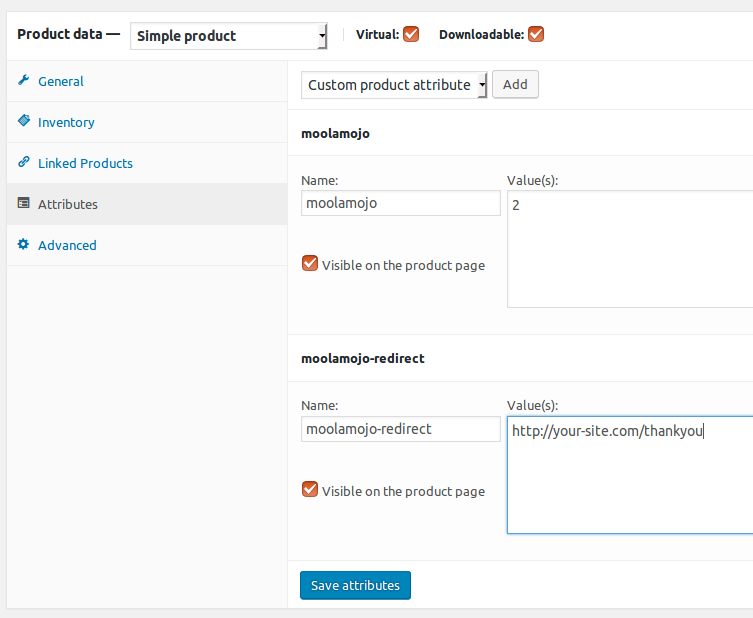
    a) Mark the product as Virtual and Downloadable
    b) Add custom product attribute with name “moolamojo” and value the ID(s) of the package(s) you want to sell. The package IDs are shown on the MoolaMojo Packages page.
  4. If you want to automatically redirect to another page after the WooCommerce order is completed, add another custom attribute called “moolamojo-redirect”. Its value should be the full URL of the page to send the user to.

Here is an example of such setup:

That’s it!

IMPORTANT: The package will be assigned only if the WooCommerce order status is COMPLETED. If the order fails for some reason or you are taking offline payment and approving orders manually, the MoolaMojo currency package will not be purchased until the order status is completed.