Test Grade Based on Question Category Performance [WatuPRO]

From version 5.5.8 the quiz/survey plugin WatuPRO supports yet another interesting option for grading the user’s performance: a grade based on the performance in each question category /  theme.

What Does It Mean?

This is different than showing grade/performance per category. It’s a method to grade the whole test (and typically determine whether it’s passed or failed) based on how the user did in the different topics in the test.

For example for a traffic law test you may have a “Passed” grade with the following requirements:

For category “General rules” require at least 90% correct answers.
For category “Street Signs” require between 80% and 100% correct answers.
For category “Priority” require between 70% and 100% correct answers.

On top of this you can also set a general requirement for the test, for example min. 85% correct answers on average for all categories.

The requirements can be based on points, percent correct answer, or percentage points achieved from the maximum points possible in the test.

How Does It Work?

  1. Go to the Grades or Manage Grades page for a selected quiz. Make sure “Manage grades / results for the [Whole test]” is selected and check the option “The final grade in this test will depend on the performance on different question categories” as shown below:
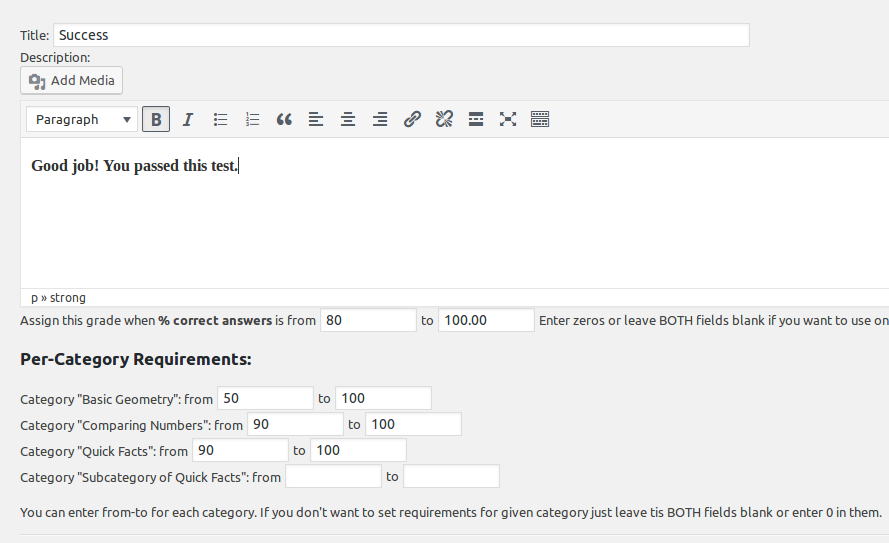
  2. The page will refresh and will show you the grade forms for adding or editing grades with new options – from/to fields for each question category (topic) that contains questions in the selected quiz:
  3. You can skip any of the categories by leaving both fields blank – this means there will be no specific requirement for that category. You can optionally set a requirement for the whole test (in the above example it’s min. 80% correct answers) or use only category based requirements.
  4. A setting in the Edit Quiz -> General settings tab defines what will be the type of criteria to check:
    a) By default all tests are graded based on number of points collected.
    b) If you check the above checkbox and save your quiz will be graded based on % correctly answered questions from total questions given to the test taker.
    c) If you check the above option but select “% from maximum points” from the drop-down menu, it will be graded based on the % achieved points from the maximum possible points in the quiz.This setting defines grading the quiz as a whole, grading based on category performance, and category grades if any.

This feature is also the best way of creating Myers-Briggs personality quizzes.

How To Design The Sign Up Forms in Arigato PRO

When you use the shortcode for a sign-up form in Arigato PRO it generates a very clean basic responsive HTML code without any pre-formatting. The idea is that the form will nicely fit your WordPress theme design and stay consistent with it.

If your theme does not have any styling of standard form elements or have odd styling you may need to modify the CSS yourself. Here is the HTML code of a basic form:

<form method="post" enctype="multipart/form-data" class="bftpro-front-form" onsubmit="return validateBFTProUser(this,false);" >
	<div><label>Your Name:</label> <input type="text" name="bftpro_name"></div>
	<div><label>*Your Email:</label> <input type="text" name="email"></div>	
	<div class="bftpro-front-signup-button">
	   <input type="submit" value="Subscribe">				
	</div>
	<input type="hidden" name="bftpro_subscribe" value="1">
        <input type="hidden" name="list_id" value="1">		
	<input type="hidden" name="required_fields[]" value="">	
</form>

Such a form looks good on our theme:

But with a bit of CSS you can make it look different if you wish. The form has class so you can style the elements. Example CSS:

.bftpro-front-form div label {
display:block;
float:left;
width: 150px;
font-weight:bold;
font-size: 120%;
font-family: Verdana;
color: darkblue;
}

.bftpro-front-form input[type=text] {
height: 25px;
font-weight: bold;
font-size: 120%;
}

.bftpro-front-form input[type=submit] {
padding:5px 15px;
background:#ccc;
border:0 none;
cursor:pointer;
-webkit-border-radius: 5px;
border-radius: 5px;
}

With this CSS the same form code starts looking like this:


Your custom CSS code can be written either directly to the theme CSS or be added on the site using a plugn like Simple Custom CSS

WooCommerce Integration in MoolaMojo

From version 0.6.8 the WordPress virtual currency plugin MoolaMojo supports selling currency packages through WooCommerce. This opens endless possibilities to sell all kind of stuff from all kind of plugins through WooCommerce. For example it becomes easy to sell virtual currency packages that can be then used to purchase access to WatuPRO paid quizzes (especially useful if WatuPRO does not support your payment processor but WooCommerce does).

Here’s what is required to make this work:

  1. WooCommerce and MoolaMojo installed and active
  2. Create some currency packages in MoolaMojo
  3. Create product(s) in WooCommerce for selling the MoolaMojo packages. You need to two things to make this work:
    a) Mark the product as Virtual and Downloadable
    b) Add custom product attribute with name “moolamojo” and value the ID(s) of the package(s) you want to sell. The package IDs are shown on the MoolaMojo Packages page.
  4. If you want to automatically redirect to another page after the WooCommerce order is completed, add another custom attribute called “moolamojo-redirect”. Its value should be the full URL of the page to send the user to.

Here is an example of such setup:

That’s it!

IMPORTANT: The package will be assigned only if the WooCommerce order status is COMPLETED. If the order fails for some reason or you are taking offline payment and approving orders manually, the MoolaMojo currency package will not be purchased until the order status is completed.