Category Archives: Tips

InstaMojo Integration for Namaste! LMS

This is no longer functional.

Instamojo completely revamped their interface and removed the old way of working with their system without any notice so we are not willing to continue development for their platform.

Instead of this integration, Instamojo users can sell quizzes through WooCommerce, using our free WooCommerce bridge and Instamojo’s official WooCommerce integration.

********************

OLD INSTRUCTIONS FOR REFERENCE ONLY

This plugin will let users from India who have the Intelligence module for Namaste! LMS to sell access to courses and classes via the Instamojo payment service.

The plugin requires Namaste! LMS min. version 1.6.2. If you use PRO, the min. compatible version is 1.1.8.

Download namaste-instamojo v. 1.1 here (18 KB)

From version 1.0 the bridge also works with the Namaste! PRO shopping cart.

How To Use It

Install the plugin and activate it. A new menu item will appear under your Namaste! LMS menu. The item is called “Instamojo integration”:

Before you can proceed you need the following:

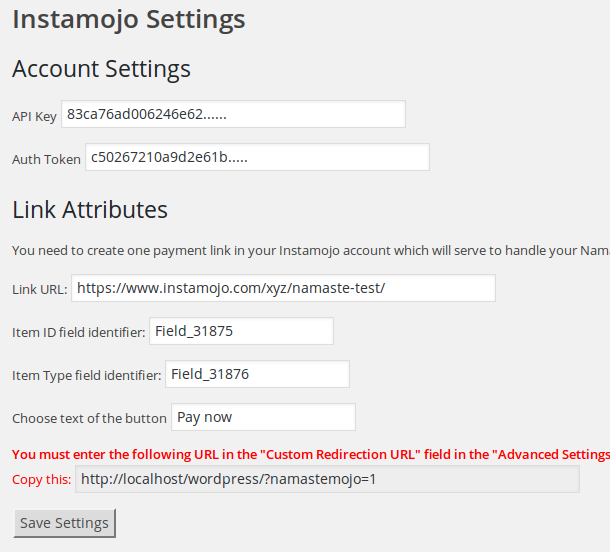
  • Your API key and Auth token. Once you have an Instamojo account you can obtain these from the Developers section.
  • A dynamic payment link. The link must have a fixed price and “Pay what you want” options selected.
  • The link must also have two custom fields added in the Advanced Settings section in your Instamojo link management page. One of the fields should be called item_id and the other field should be item_type.
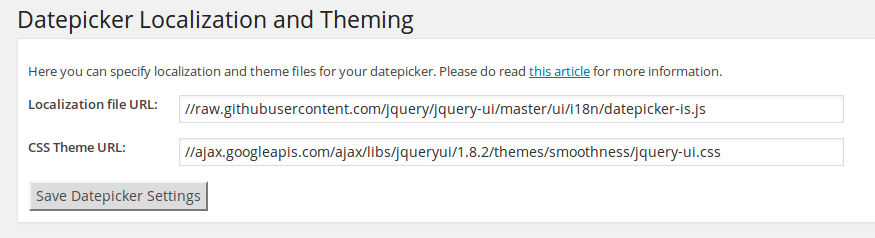
  • It needs to have “Custom redirection URL” attribute also set up. You can see the URL in your “Instamojo Integration” page in Namaste! LMS.

Once all this is done, ensure a couple more things:

1. You must enter the field identifiers of the custom fields in the Instamojo Integration page. The field indentifiers are visible in the “Custom fields” section of the Instamojo link management page for the given link. You need to mouse over the field names to see the identifiers.

2. You have to enter the following code inside your “Other payment instructions” box in Namaste! LMS Settings page (exactly as you see, just copy and paste)

[namastemojo-button amount="{{amount}}" item_id="{{course-id}}" item_type="{{item-type}}"]

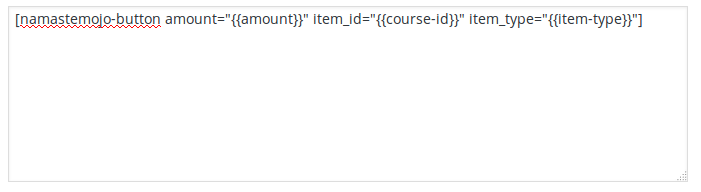
This will generate a payment link on your paid quizzes. It can work along with all other payment methods. The payment link has class “namastemojo-button” so feel free to style it.

Create a Text-Based / Question-Based “Captcha”

Google’s recaptcha is really good but not always the most optimal tool for stopping spambots. It takes a bit too much space, requires entering app IDs, and sometimes is hard for the visitors to solve.

Question based captcha’s are often easier solution. A simple question that requires textual answer is usually enough to keep most bots away, and is easy to code, requires no graphic libraries or API keys.

Two of our WordPress plugins – WatuPRO and Arigato PRO already implement such captcha features with great success. Here’s how we did it:

The steps

There are two main steps: to generate the captcha, and to verify it. In the case of our plugins we let our users to create their own questions in the admin panel. Here for simplicity we’ll assume the questions are hardcoded in a PHP array.

Generating the captcha

So, let’s assume we have the questions in array called $captcha_questions in such format:


$captcha_questions = array("What is the color of the snow? = white",
                          "Is fire hot or cold? = hot"
                          "In which continent is France? = Europe");


This code uses one array element for question and answer separated by = sign. You can of course use array of arrays or key => value pairs. But the above example is closer to to the format we let our plugin users input for questions in their admin panel.

So, now we need one random question of these and need to display it on the front-end:


shuffle($captcha_questions);
$question = $captcha_questions[0];
list($q, $a) = explode("=", $question);
$q = stripslashes($q);


Now let’s echo the question on the screen and display a field to enter the answer. You need also one hidden field. Depending on how you keep your questions in the database you may want to pass question ID. If you use hardcoded array of questions you can pass the question key. Or if you use something else, just pass the question itself – it’s a good idea to use base64_encode to ensure easier matching on the back end.
Do not, of course, include the answer anywhere on the page:

echo trim($q)." <input name="text_captcha_answer" type="text" />\n<input name="text_captcha_question" type="hidden" value="\"".base64_encode(trim($q))."\"" />";

Verify the captcha

I’ll just to ahead with the whole function and then explain:

// this function will actually do the verification
function verify($question, $answer) {
     $answer = stripslashes($answer); // don't forget this or you may get unexpected results
		
     // the $captcha_questions variable needs to be recognized here as well. Use global, constant,  DB entry etc

     $question = base64_decode($question); // decode the hidden field with the question
	
     // go through all questions and compare	
     foreach($captcha_questions as $captcha_question) {
	list($q, $a) = explode("=", $captcha_question);
	$q = trim($q);		
	$q = stripslashes($q);
	$a = stripslashes($a);
				
	if(strcmp($q, $question) == 0 and strcasecmp(trim($a), trim($answer)) == 0) return true;
}		

That’s it. The above function goes through all the questions in the array (note that the code does not show where $captcha_questions variable comes from – don’t use the function as is, you need to declare the variable), explodes question and answer and then compares each of the combinations to the values given to the function. In case of match, returns true.

Pay special attention to using stripslashes() and trim() or you’ll have a lot of headaches to figure out why captcha answers are not correct.

Note also that we use strcasecmp to compare the answer to the question because we don’t want the check to be case sensitive.

And here is how to use it roughly:

// the user has submitted the form. Use different variable name if you wish
if(!empty($_POST['submit'])) {
   // verify the captcha
   if(!verify($_POST['text_captcha_question'], $_POST['text_captcha_answer'])) die("The answer to the verification question was not correct.");
   
   // now process the form
}

The above code isn’t super user-friendly because it will simply die in case of error. I recommend you to implement the check with ajax and stay on the same page until correct answer to the question is given.

Localization and Styling Of The Datepicker in Hostel and HostelPRO

From version 1.5.9 the HostelPRO WordPress plugin and version 0.8.9 of the free Hostel plugin  there are a couple of settings that will let you easily localize and style the datepicker (calendar).

Here is how. Go to the HostelPRO Settings page and scroll near the bottom where you’ll see the following:

datepickerThe first box is blank by default. If you leave it blank, your calendar will be in English. If you want to have the datepicker in your language you need to enter localization file URL in the box.

All the jQuery UI Datepicker localization files are available at this URL. Pick the one that you need and click on it. Then click on the “Raw” button:

raw-githubThis goes to a javascript file that will be shown directly in your browser. Although you can copy the URL from the address bar of your browser and use it directly (like on our screenshot), we don’t recommend this. It’s better to save the file in your computer and then upload it to your blog. You can use the “Media” menu in your WordPress dashboard and upload the file, then get its URL. Save it in the box and that’s all – your datepicker is now going to be in your desired language.

For best performance it’s recommended that your whole blog is also localized.

The CSS theme URL defines how your datepicker is styled. We load the “smoothness” theme by default but you can change this by entering different CSS URL. Many ready themes are available on the CDN here. Just select one and feel free to copy the URL and save it. (Or download the file if you prefer, like with the localization file).

That’s it, the theme will be changed after saving. Of course you can also use the Theme Roller to create your own CSS.

Note that If you run both Hostel and HostelPRO for some reason, these settings are shared. Whatever you set in one of the plugins, affects the other one just like it is with rooms, rates etc. This ensures that when users upgrade from Hostel to HostelPRO there is no need of any manual data transfer.