Author Archives: admin

Troubleshooting Email Sending Problems In Arigato PRO

You have created a campaign or a newsletter and have a mailing list, but emails are not sending as expected? Frustrating for sure. This guide will help you figure it out quickly.

There are exactly two possible causes (excluding the possibility that you just did not sent that newsletter) why emails would not be sent:

  • The server is not sending emails
  • The cron job is not running

How To Know What Is The Problem?

Very easy. Make sure one of your mailing lists has “double opt-in confirmation” selected and sign up for it (sign up from the front-end, not from admin). You should receive a confirmation email in a minute or so with a link to activate your account. Possible outcomes:

  • The email is received. Good, your server is sending emails fine. Now you know that the problem is not working cron job and you can go straight to the next section.
  • The email is in spam. Your server is sending the emails but they go to spam. Read this. Check also if the expected newsletters / autoresponder messages are there. If they are, you know the problem, read the guide linked above. If they are not, you have two problems: emails going to spam and cron job not working.
  • The email is not received anywhere. This means your server is not sending emails (please note Arigato simply relays emails to WordPress and problems with sending emails do not originate in the plugin). How to resolve: install Easy WP SMTP or a similar SMTP plugin and try again. Very often this will solve the problem because using SMTP is far more reliable than using the default WordPress mailing function. If the email is still not received, send a test email through your SMTP plugin. Then forward the debug information it provides to your hosting support so they can check what’s wrong.
  • Never send emails from Gmail email address if you are not using Google’s SMTP. Google will block these emails as phishing suspects and they will never be delivered. You can use @gmail.com address as sender ONLY if you are using Gmail as your SMTP.

Cron Job Not Working?

A “cron job” is the scheduled task that takes care to send your newsletters in batches and the autoresponder messages at the right time. Did you set up a cron job after installing Arigato PRO? Go to your Arigato PRO Settings page and check what you have selected:

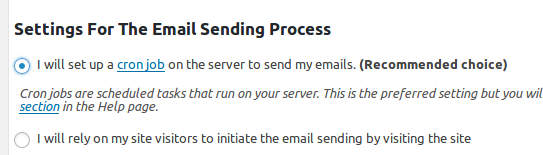
If you have selected the first option like on the screenshot, you must set up a scheduled task (cron job) on your Cpanel. More about this below.

If you have selected the second option, you don’t need to set up a scheduled task. The option is reliable enough but your site should have at the very minimum 5 – 10 visitors every day, preferably more. You can have a bot or script to do this using a service like UptimeRobot.

We need to discuss more about the first option. To set up a cron job you need to copy the command shown in your Arigato PRO Help page and place it in your hosting control panel. If you have never set up a cron job before, check this guide. We have given two commands that should work fine on 99% of the servers. Try with first command and see if the cron job is running – you can check this at the Help page -> Cron Job Log tab.

Possible outcomes:

  • Seeing ” Cron job ran at…… with result: Success”. Good, it’s working.
  • Seeing “Temporary lock file protection in effect” messages. Good, this is not error. It just means that the cron job runs a bit too often and hits the duplicate emails protection.  It’s working fine. You can decrease the frequency of your cron job but nothing else is required. Not even emailing us asking why you see this message in the log.
  • Seeing some other error. You may need to email your hosting support or us about it.
  • Not seeing any entries in the log. This means that the command is not correct on your server. Try the second command, wait until it has to run and check the log again.

You’ll either have it running now which means problem is resolved, or not running, in which case you have the following options:

  • Contact your hosting support for help. Only they could know what is the correct command on their server to run a PHP script.
  • Use a service to hit your cron job URL from the net. The exact URL is shown as third command in your Help page inside your Arigato PRO menu:
    (please do not retype the URL from this screenshot. It’s our URL. Yours is different and is shown in your Help page). There are many free or very low priced services which will do this work for you. We recommend cron-job.org which is completely free.

Don’t forget also that if your site is regularly visited you can simply use the option “I will rely on my site visitors to initiate the email sending by visiting the site”.

Arigato PRO is giving many options that should handle every server.

WatuPRO 6.1

The WordPress quiz plugin WatuPRO has been updated to version 6.1. Here is the list of improvements and fixes:

  • Now the rich text editor is available on all answers of questions without the need to save the question first, all on the same page, in a lot more convenient way than before.
  • Difficulty level can be passed in the quiz shortcode like this: watupro X difficulty_level=”Easy” (where X is the quiz ID). In such case it will override any selection made in the Edit quiz form.
  • You can overwrite the default style.css file by placing a copy of it in your theme folder, under folder called “watupro” (similar to how you can override view files and the main JS file). Note that this should be used only for quite specific adjustments. Most design adjustments are better done by design themes.
  • Now you can have more than one certificate earned by a single test attempt: one regular certificate attached to a grade plus any number of “multiple quiz” certificates as long as taking that specific quiz triggers them because of satisfied requirements.
  • Each certificate allows using custom text for the %%CERTIFICATE%% variable on the final screen. When used will replace the default “You can now print your certificate” text.
  • Multiple quiz certificates can require min. percentage and points for every quiz in the selected group instead of just averages from all attempts. For compatibility with existing setups the old option remains default.
  • The quiz timer support decimals, for example 2.5 minutes.
  • Placing the tag {{{loggedin}}} inside the final screen allows you to show different content to logged in and non-logged in users. The contents before the tag will be shown to the logged in users  and the contents after the tag to the strangers. This lets you for example invite visitors to register to take new quizzes and so on.
  • When user ran out of time in a timed quiz and their results were automatically submitted, this will be shown under “time spent” column on “View results” page.
  • The feature “Hold displaying the results until a date in the future” (available in the Final Screen tab of the Edit quiz page) now allows you to limit this holding period only to chosen user groups or user roles. This way for example you can have immediate results for premium users and delayed results for other users.
  • Added optional log for tests with timer. You can enable it from the Advanced Settings tab of Edit quiz page. Do it only in case you suspect timer problems.
  • You can now allow users to print the final screen as PDF. The option is on Edit Quiz -> Quiz Output tab and requires PDF bridge version 1.4.3 or newer.
  • Added filter for developers which allows you to plug in completely custom grade calculation. More information at https://blog.calendarscripts.info/watupro-developers-api-custom-grade-calculation/
  • Resolved CSS conflict with MathJax on some themes. If you have problems with formulas you need to check the MathJax checkbox on WatuPRO Settings page.
  • Improvements to the category based paginator: highlights the first category at initial loading and properly highlights the category tab when going back to previous question with the Previous button.
  • When a numbered question paginator is used and a question is marked for review the number for that question will get a dashed border.
  • Added attribute “per_page” to the watupro-takings shortcode to specify other than the default 10 results per page. Set it to -1 if you want to display all attempts on a single page.
  • Made improvements to timer handling and logging.
  • Added option to enter your custom “You need to be logged in or registered” text for user-only quizzes along with custom login URL. This allows to integrate better with custom built login and registration pages, use your own image or button etc.
  • Added filter ‘watupro-user-file-uploaded’ before storing user uploaded files as question answers.
  • New parameter added to watupro-takings shortcode: show_contact_data. When set to 1 it will display the additional contact data from the “ask user for contact details” section, when such data is collected. Note that this data will be shown under the name and not in separate columns.
  • Added option to show category title and description on every page when the questions are grouped per category but the pagination is not “one page per question category”. For example this can be very useful for quizzes paginated one page per question.
  • Now you can use your custom social sharing buttons. Set their URLs on the WatuPRO Social Sharing options page.
  • The WatuPRO Options page now has tabs for easier navigation.
  • Added quiz ID filter to the other filters on Manage Quizzes page.
  • Added shortcode watupro-paginator to place the questions or category paginator outside of the quiz shortcode (for custom layouts). More details in the Help page inside your WatuPRO menu.
  • The external paginator shortcode now allows vertical display.
  • Added 25px default space before the “Question X of Y” line and made this configurable in the Settings page -> Theme and Design tab.
  • Made improvements to the responsiveness of the buttons under the quiz. They will flexibly flow on various devices and screen sizes. The legacy buttons table can still be preferred by adjusting a setting in the Theme and Design tab of the WatuPRO Settings page.
  • Added subcategories to quiz categories for better organization.
  • [Intelligence module] Added option to replace user entered multiple spaces in “Fill the gaps” questions with single space to ignore basic typing errors. The option is in the Advanced Settings tab of the Edit quiz page.
  • [Intelligence module] Added optional attributes for the bundle buttons that allow you to display text with dynamic price above each button. You can find information about the attributes on the Manage Quiz Bundles page under the table with bundles.
  • [Intelligence module] New option in personality quizzes allows you to have only one personality assigned as a result even if multiple personalities collect equal maximal number of points. If you select the option, one of the matching personality will be randomly selected.
  • Added more space between question choices on small screens to avoid clickable elements being too close together on the screen. This can be changed in the Design Adjustments section of the WatuPRO Settings page.
  • Fixed issues with %%ANSWERS-PAGINATED%% variable: an un-closed div and not showing uploaded files for questions that accept them.
  • Fixed bug: {{{ID}}} variable was not replaced in “table view” of the View Details popup.
  • Fixed issues with FB sharing, used the new SDK because the old dialog is no longer supported properly by FB.
  • Fixed CSS issue with prev/next buttons showing one under the other on mobile devices.
  • Fixed bug: “details_no_popup” attribute did not work in watupro-myxeams shortcode.
  • Fixed bug: when “0” was entered as possible correct answer on an open-end question it was not recognized as correct.
  • Fixed bug: after introducing decimals in timer the option to let user choose questions did not work.
  • [Intelligence module] Fixed bug with saving custom currency on the Payment Settings page.
  • Fixed bugs with saving Facebook sharing options.

Myers-Briggs Tests in WatuPRO

This tutorial will show you how to create Myers-Briggs personality quizzes in WatuPRO. It covers the technical side of things and not the psychological side – we won’t be showing what specific questions you have to ask to create such tests. This example will be about creating a “Keirsey temperaments” tests but it can be used for any other kind of Myers-Briggs type of quiz.

If you prefer a video, here you go:

Still we recommend reading the post below for more details.

Step 1: It Does Not Need To Be Marked as a Personality Quiz

I know it may sound confusing, but because Myers-Briggs is a very specific type of test, it’s actually easier to be created as a “knowledge” test where answers get points assigned to them and do not directly assign a personality type. So you don’t need to select the following setting:

No need to select that this is a personality quiz

Leave it unchecked.

Step 2: Create Question Categories

Because Myers-Briggs tests rank the respondent into multiple categories, you need to create them as question categories in the system. Using the classic example, there are four categories: Extraversion/Introversion, Sensing/Intuition, Thinking/Feeling, and Judging/Perceiving:

Create question categories

There is no need to create question sub-categories.

Step 3: Create Your Questions

It’s up to you how many questions you are going to ask and how many points you’ll assign to each of the answers. Typically these tests have mostly single-answer questions but it’s also very common to use “from-to” sliders and likert scales.

What is important here is:

  • Each of your questions should belong to one of the four categories. If it’s a question showing how introvert is the quiz taker then it goes to Extraversion/Introversion category. If it’s about sensitivity it goes in the Sensing/Intuition category and so on.
  • Decide how you will assign the points. For example if you have 10 questions in each category and each question gives from 0 to 10 points depending on the answer, this means the user cat collect between 0 and 100 points in each category. This is important for the next step where you’ll define the grading.
  • You need to follow some logic: for example if the answer means the user is more inrovert you may want to give more points to that answer. Follow this logic on all questions so at the end more than half of the possible points collected will mean the user is more extrovert than introvert. Similarly do in the other categories.

Step 4: Create Your Grades (Personality Types)

This classical type of Myers-Briggs test has 16 possible combinations of user’s performance in each category, so it has 16 personality types (see here): ISTJ, ISFJ, INFJ, INTJ, ISTP, ISFP, INFP, INTP, ESTP, ESFP, ENFP, ENTP, ESTJ, ESFJ, ENFJ, ENTJ.

So, you need to create 16 grades or personality types for this test. Here’s the most important part: you need the option “The final grade in this quiz will depend on the performance on different question categories” selected:

Select that final grade will depend on category performance

This will allow you, for every single result, to define the ranges of points that the user needs to collect in order to fall into it. So if we go back to our example with 0 to 100 points possible in each question category, we’ll then know that between 0 and 50 puts the respondent in the first group for that category (which in Extraversion/Introversion would mean he’s an extravert) and 51 to 100 points puts the user into the other group (inroverts). Knowing this for every of the 4 categories, we are able to define the exact criteria for each “grade”:

ISTJ example

ISTJ example

The above example is ISTJ: more points going to Introvert, all other categories got less point which put the user into the first group of each. Please note it’s up to you how many points can be in category and how the points put the user into one of the two groups, but it’s important to follow the same logic in all questions.

Here’s an ESFP example:

ESFP example

ESFP example

Here the user ranks as extrovert, perceiving, sensing and feeling. Note that the system will show you the categories in alphabetical order, not in the order of Myers-Briggs tests so be careful how you enter the point ranges.

Step 5: Display Quiz Results

Because these tests are specific you will most likely not want to show points, % correct answers, etc standard texts at the end of the quiz. You’ll most likely want to show only the achieved result. So go to Edit Quiz -> Final Page / Quiz Result and edit the default content to something like this:

editing the quiz output

This is probably all you want to display. If for some reason you want to include also the %%ANSWERS%% variable to show how the user answered each question, you will not want to show correct / incorrect checkmarks because such quiz has no correct or wrong answers. So go to Edit Quiz page -> Advanced Settings tab and select to hide them:

hide correct / incorrect checkmarks

That’s it, now your Myers-Briggs test needs only to be published.